Ads 468x60px

Pages

Rabu, 31 Juli 2013

Error code 0xc18a0106 on HP Photosmart printers


Solution 1:
  • Push "OK", "Cancel", "Black" and "Color" all at once while turning the printer off.
  • Turn it back on. 
  • One more time: push "OK", "Cancel", "Black" and "Color" all at once while turning the printer off.
  • Turn it back on.

Solution 2: Resetting the product:
  • Without turning off the product, disconnect the USB cable from the rear of the product.
  • Remove the cartridges from the product.
  • Wait for the "Insert Cartridges" message on the control panel.
  • Disconnect the power cord from the back of the product.
  • Wait 60 seconds.
  • Reconnect the power cord. If the product does not automatically turn on, press the Power button.
  • Reinsert the cartridges, and then close any open doors on the product.
  • If you receive a prompt to print a calibration page, do so.
  • Reconnect the USB cable to the rear of the product, and then try printing again.

Solution 3:
  • 1. Get the unit into the “Support Menu” by following these steps: Press and hold the “*” key. Press the “#” key and release both keys. Display should say “Enter Special Key Combo”. Press and release in sequence the “1”, “2” and “3” buttons. Display should say “Support"
  • 2. Press and release the right arrow button until the display says “System Configuration Menu”.
  • 3. Press and release the “OK” button.
  • 4. Display should say “Hardware failure status”. If not there already, Arrow Key over to “Hardware failure status”,
  • 5. Press and release the “OK” button.
  • 6. Display should say “Hardware failure status: Clear. Press OK to clear”.
  • 7. Press and release the “OK” Button. Message changes to “Hardware failure status Cleared. Press Cancel to continue”.
  • 8. Press and release the “CANCEL” button as many times as necessary, so that, either the “Welcome to Photosmart Express” screen appears, or, the “Ink System Failure” screen appears. DO NOT TRY TO PRINT AT THIS STAGE.
  • 9. Using the Power Button, turn the unit OFF and unplug the power cable from back of the printer and wall outlet.
  • 10. Wait 30 seconds for the power to get discharged and then plug the power cable into the wall outlet first and then into the back of the printer
  • 11. Turn the unit on. The printer may display message “USE POWER BUTTON TO SHUTDOWN THE PRINTER” followed by “PRESS OK TO CONTINUE”. Press OK.
  • 12. If the printer has already initialized, then go to the next step. If not, the printer will start the “ONE TIME INK INITIALIZATION PROCESS”. Allow this process to complete and do not interrupt. Once the initialization process is complete, the printer will print out a Diagnostic Page.
  • 13. To verify printer functionality print a SELF TEST PAGE. If SELF TEST prints, then printer is ready for use or Software Installation.
  • 14. If the error is still there, or reoccurs replace the unit.
Read More..

Drum Counter reset for Oki c5300n


a. Press the MENU 1/Menu 2 button while turning the printer on. "USER MNT" appears on the display.
b. Press the MENU 1/Menu 2 button until the message corresponding to the color drum you are replacing appears.
c. Press the ENTER/POWER SAVE button. RESETTING briefly appears on the display.
d. Press the ON LINE button.
Read More..

Service Call Error E50 on Brother HL 1650 1850 1870N


Solution 1:
  • Depressing the "Go" and "Set" buttons simultaneously while turning on the power.
  • Continue to depress the "Go" and "Set" buttons until the LED display shows "Go Test Mode". Release the "Go" and "Set" buttons.
  • Depress only the "Go" button again and the printer will start normally.

Solution 2: there are caked ink and dust on a wire connection that touches the grey roller of the fuser.
  • Remove the electrical cord from the back of copier. 
  • Remove bottom tray. 
  • Remove the smaller tray that comes out the back that has a LTR/A4 lever. 
  • Open front of machine to take out toner and drum. Leave open. 
  • Take off top cover (4 screws and two wire jacks to unplug). 
  • Remove screw on back right side near bottom. 
  • Remove screw on front left near bottom that holds left side cover. 
  • Remove screw on back left near bottom (it holds a piece in the back and the side cover). 
  • Slightly pull out that back, left plastic piece and wiggle things around to get the left side cover off. That back left piece that didnt come out all the way has a plastic tit holding it in. To be able to press that tit is why the side cover is removed. Press tit and pull the back left piece out while wiggling things around to get the 3 plastic pieces in the back to all come out. This exposes the fuser. 
  • Reomove the two wire jack connections.
  • Remove the two screws holding fuser in. One of those screws is big with a spring. 
  • Find the 2 black wires on the fuser leading to the problem piece. Remove the single screw holding it in. 
  • Pull it out and clean the wire connections.
    Read More..

    Printer Xerox Phaser 7700 error codes

    • Error Code 10: Laser Unit failure
    Solution: Remove Rear Cover , Disconnect P400 , and P401 on the Engine Control Board. Inspect both connectors to determine they are fully engaged as a unit. Re-engage, if necessary.
    Carefully reinsert the plugs into their joint socket and FIRMLY seat them.

    If the problem persists, replace the Laser Unit ,and , or , the Engine Control Board (116-1144-00).

    • Error Code 11: Laser Unit Polygon Motor Failure
    Solution: Remove Rear Cover , Disconnect P400 , on the Engine Control Board. Inspect both connectors to determine they are fully engaged as a unit. Re-engage, if necessary.
    Carefully reinsert the plugs into their joint socket and FIRMLY seat them. Replace the Laser Unit , If the problem persists, replace the Engine Control Board (116-1144-00).

    • Error Code 12, 13 ,14 and 15: ATC Sensor Failure
    Solution: Remove the Rear Cover , and Rear Shield , Measure the voltage at P534-5 on the Engine Control Board. Does the voltage measure between +1 VDC and +3 VDC ?
    If yes: Replace the Engine Control Board (116-1144-00).

    If no: Replace the Developer Housing Assembly

    Replace the Engine Control Board , Replace the Developer Housing Assembly
    If this failure reoccurs three times successively, an Engine NVRAM value is set preventing further printer use until the NVRAM Access.Clear Tech Rep Fault / Clear &<09-380 ~ 09-383> is run.
    • Error Code 30: Accumulator Belt home position took too long
    Solution: Ensure the Accumulator Belt shipping restraints have been removed. Enter Service Diagnostics Mode; Run the “Clear Tech Rep Fault”.
    Lower the Main Release Lever and return to the upright position to reestablish electrical connections to the belt. Open the RH Door and defeat the interlock switch.
    Look for rotation of the Accumulator Belt during the following test.
    Enter Adjustments / Calibrations menu. Run the “Belt Edge Learn” test.
    If the problem persists, replace the Engine Control Board (116-1144-00).


    • Error Code 40: Fuser Main lamp failure
    Solution: Switch printer power OFF. Remove the Fuser Assembly.
    Warning Fuser may be very hot. Use extreme caution to prevent burns. Measure the resistance between the Fuser Assembly connector P600-4 and P600-6. Does the resistance measure between 20K and 100K ohms ?
    If no: Replace the Fuser Assembly.
    If yes:  Reinstall Fuser, Remove the Rear Cover, Rear Shield and the Rear Shield Bracket , Measure the resistance between P404A-1. Does the resistance measure between 20K and 100K ohms?
    If no: Repair or replace the wiring harness between the Engine Control Board and the Fuser.
    Replace the Engine Control Board (116-1144-00).


    • Error Code 54: Fan failure
    Solution: Enter Service Diagnostics Mode. Run the “Fuser Fan” test. Does the Fuser Fan operate?

    If yes: replace the low voltage power supply fan.

    If no: replace the fuser fan.


    • Error Code 60: Drum motor failure
    Solution: Enter Service Diagnostics Mode and run the “Print Cartridge Motor” test. Does the motor run?
    If yes: Replace the Engine Control Board
    If no: Remove the Rear Cover , the Rear Cover Shield , Measure the voltage at the Print Engine Controller Interface Board P407-4(+) and frame ground. Is the voltage +5 VDC ?
    If no: Replace the Engine Control Board (116-1144-00).
    Read More..

    Selasa, 30 Juli 2013

    Waste ink tank reset for Canon MP190


    You have to do so:

    1) Enter service mode by pressing: MENU, COPY, SCAN, COPY, COPY
    2) Select TEST MODE
    3) Select (8) PRINTER TEST in TEST MODE
    4) Select (3) (eeprom clear)
    5) Select (0) (ink count)
    6) Press the SET key
    7) Press the STOP/RESET key, then press power key to power off
    Read More..

    Message Error call service 7980 on Kyocera printers


    This error code appears on these printes:
    • FS-1116MFP, FS-1118MFP, FS-1016MFP, FS-118MFP, KM-1815, CS-1820...


    Cause
    •  Waste toner tank overflow
    • If the bottle is not full then the sensor thinks it is


    Solution:
    • Clean the sensor
    • Replace waste toner tank
    Read More..

    Reset Canon MX308

    Reset Canon MX308


    Step by step reset Waste Ink Absorber Full printer Canon MX308.

    Run Service Mode:
    • Press and hold "Stop/Reset" and the "Power" buttons.
    • Release the "Stop/Reset" button.
    • Press the "Stop/Reset" button twice, (still holding the "Power" button).
    • Release the "Power" button. Your printer is now in Service mode
    Reset:
    • Insert paper into the paper tray.
    • Press "Stop/Reset" button 4 times, this will select the clear waste ink counter function.
    • Press the "Power" button to turn off the printer.
    If it does not work, try this after "Run Service Mode":
      • Insert paper into the paper tray.
      • Press "Stop/Reset" button 1 times then press Power botton, wait until printing finish.
      • Press "Stop/Reset" button 2 times then press Power botton. wait until printing finish.
      • Press "Stop/Reset" button 3 times then press Power botton.
      • Press "Stop/Reset" button 4 times then press Power botton.
      • Press the "Power" button to turn off the printer.
      • The printer will now work normally.
      Read More..

      Canon IR1600 error codes

       
      • E000: The main thermistor reading does not reach 40ºC 14 sec after the fixing heater goes ON. (fixing low temperature error)
      • E001: The main thermistor reading reaches 220ºC or higher.
      • E002: A start-up fault is detected under any of the following conditions of the main thermistor
      • E003: After the end of the WAIT period, the main thermistor reading is 100ºC or lower. In standby, the sub thermistor reading is 50ºC or lower.
      • E004: At time of initialization, the ZEROXI signal of the power supply is not detected. During temperature control, the ZEROXI signal does not arrive for 3 sec continuously. A short circuit is detected in the triac
      • E010: A specific revolution is not detected from the main motor rotation detection signal.
      • E100: When the scanner motor is started up, the BD input signal does not arrive within a specific period of time.
      • When the scanner motor is started up, the motor rotation is too fast, and fails to reach a specific revolution within 20 sec at time of deceleration. While the scanner motor is rotating at a specific speed, the BD input signal cycle is not within a specific range (±2%) for an equivalent of 10 mm (print distance). While the scanner motor is rotating at a specific speed, the BD input signal cycle is not as indicated (±2%).During the WMUPR period after the power switch has been turned on or the front cover/left cover has been opened/closed, the drum unit is absent.
      • E719: The communication between the card reader and the image processor PCB is disrupted.
      • E805: After the heat discharge fan drive signal is generated, the fan lock detection signal does not arrive for a specific period of time.
      • E500: An error has occurred in the communication between the machine and the finisher twice continuously.
      • E514: The stack delivery belt does not reach home position when the stack handling motor (M2) is driven for a specific time (CW; if the same condition occurs during stack delivery, a jam will be identified).
      • E530: The rear aligning plate does not reach home position when the rear alignment motor (M4) has been driven for a specific time.The rear aligning plate does not reach home position when the rear alignment motor (M4) has been driven for a specific time.
      • E531: The stapler does not leave the stapling home position sensor (S13) within 0.5 sec after the stapler motor (M6) is rotated CW.The stapler does to return to the home position sensor (S13) within 0.5 sec after the stapler motor (M6) is driven CW and, in addition, it does not return to the sensor within 0.5 sec after the motor is driven CCW thereafter.
      • E537: The front aligning plate does not reach home position when the front aligning motor (M3) is driven for a specific time.The front aligning plate does not leave home position when the front alignment motor (M3) is driven for a specific time.
      • E551: The delivery fan rotation signal (FNALCOK) does not arrive within 1 sec when the heat discharge fan drive signal (FANON) is sent.
      • E577: The return roller does not reach home position when the delivery motor (M1) is driven for a specific time. (If the same condition is detected while alignment takes place in the direction of feed, a jam will be identified.)
      • E580: The stack tray upper limit sensor (S1) goes ON while the stack tray up/ down motor (M5) is in operation.The clock signal of the stack tray up/down clock sensor (S9) is not detected 15 times or more within 0.8 sec while the stack tray up/down motor (M5) is in operation.It does not reach the stack tray paper height sensor (S10) 2 sec after the stack tray up/down motor (M5) rotates for ascent.It does not leave the stack tray power height sensor (S10) 2 sec after the stack tray up/down motor (M5) starts to rotate for descent.
      • E585: The stack retaining lever does not reach home position when the stack handling motor (M2) has been driven for a specific time (at the start of motor CCW rotation). (If the same condition is detected during stack delivery, a jam will be identified.)
      Read More..

      Senin, 29 Juli 2013

      Error 61 05 on HP Designjet

      This system error indicates a communication error.

      Solution:
      Check the cable connection between the plotter and PC, retry the print job.
      Make sure you are printing the job over the right driver (in a proper format) - not a HPGL/2 job to a plotter with no HPGL card or a Postscript job to a plotter with no Postscript support.
      Read More..

      Cold reset for HP Laserjet M5035


      Procedure:
      • Turn the off the device.
      • Turn the device on and immediately hold down the 6 button on the control-panel keypad as soon
        as the control-panel display backlight illuminates.
      • Continue to hold down the 6 button until all three control-panel LEDs remain illuminated. Release
        the 6 button.
      • Use the 3 button or the 9 button to scroll to the desired low-level service mode function.
      • Press 6 to select the desired low-level service mode function.
      • Use the 3 button or the 9 button to scroll to function options. Press 6 to select a function option
        setting.
      Read More..

      Reset transfert belt counter on Xerox Phaser 6110 MFP


      Sometimes, when you have replaced the Image Transfer Belt, the printer still does not work. You will have to reset the counter.

      Procedure:
      • Enter Service Mode by pressing [MENU] [#] [1] [9] [3] [4] quickly.
      • Select Tech Menu
      • Select DataSetup
      • Arrow to Clear Counts and press Enter
      • Enter Password 1934
      • Arrow to Transfer Belt and press Enter.

      The display will show Clearing Counts and then return you to the Tech Menu. Press exit several times to exit the Tech Menu and then power cycle the printer.
      Read More..

      ServiceTool V1050

      Service Tool V1050

      Download here
      Read More..

      Minggu, 28 Juli 2013

      Oki C5400 reset


      Re-setting the drum, belt and toners for Oki C5400.

      1. Power on printer while holding both the "+" & "-" buttons simultaneously; release when “OKIUSER” is displayed.
      2. Press either the "+" or "–" button until “ENGINE DIAG MODE” is displayed; press "Enter" and “DIAGNOSTIC MODE xx.xx.xx” will be displayed.
      3. Press and hold both the "-" & "On-line" buttons simultaneously until “ENG DIAG LEVEL2” is displayed.
      4. Press either the "+" or "–" button until “CONSUMABLE COUNTER SET” is displayed, press "Enter" to go in the menu to set various consumables.
      5. Press either the "+" or "–" buttons to go to the desired consumable and press "Enter": the last digit of the count will start flashing.
      6. Press "Cancel" to decrease the digit amount or press the "On-line" button to increase the digit amount; press the "+" or "–" buttons to move along individual digits in the count.
      7. Once the count is at the level you desire, press and hold the "On-line", "Cancel", and "Back" buttons simultaneously until the “*” reappears next to the count; consumable’s count has been reseted to the number specified.
      8. Press the "+" or "–" buttons to move to the next consumable and repeat at step 5.
      9. Once all consumable counts have been set to desired amounts that are below their end-of-life thresholds, use the "Back", "+", and "-" buttons to exit through the menus (reverse of steps 2 through 4) until “INITIALIZING” is displayed.
      10. Turn off the printer and turn on.
      Read More..

      Selasa, 23 Juli 2013

      Reset cx6500

      How to reset Epson CX6500 or any multifunction:

      • Press and hold B/W+COLOR+STOP

      • Push power on button, don’t release all the button until you see the light indicator is blinking and then a message display on the LCD

      • Release your fingers from the button

      • Press the COLOR button to clear protection counter

      • Press power button (turn off)

      • DONE!
      Read More..

      SSC Service Utility Software to reset Epson printers


      SSC Service Utility allow to do many things with Epson printer :


      - Work directly with CSIC in Epson Stylus printers cartridges.
      - Reset or rewrite any chip using special addon device.
      - Freeze internal ink counters.
      - Reset internal ink counters even with empty cartridges.
      - Separate cleaning of color and black heads for all Epson inkjet printers, powerful cleaning mode.
      - Hot swapping of cartridges supported.
      - Resetting of protection counter.
      - More then 100 different Epson printers supported


      The site: http://www.ssclg.com/epsone.shtml

      Download the 4.30 version


      Printers you can reset with SSC utility:

      Epson Stylus Сolor 400/440/480 LPT/480SXU/580/600/640/660/670/680/777/740/760/ 800/850/860/880/900 / EM-900C/980/1160/1520/3000
      C20 / C40 / CL-750/C41 / C42 / C43 / C44 / C45 / C46 / C47 / C48/C50/C60/C61
      C62 /C63 / C64 /C65 / C66/C67 / C68 / D68/C70/C80/C82/C83 / C84/C85 / C86/C87
      C88 / D88 and PE
      Photo RX420 / RX425 / RX430 /RX500 / RX510/RX520/RX600 / RX610/RX620/RX700 CX3100 / CX3200/CX3500 / CX3600 / CX3650/CX3700/CX3800 / CX3810 / DX3800/CX4500 CX4600/CX4100 / CX4200 /CX4700 / CX4800/DX4200 / DX4800 /CX5100 / CX5200 /CX5300 / CX5400 CX6400 / CX6600 /CX6300 / CX6500 /CX7800 Photo /Photo EX /Photo 700 / IP-100/750 / PM-770C /780 / 790 /
      PM-780C /810 / 820
      Photo 820 /825 / 915/830 / 830U/870 / PM-875DC /R200 / R210/R220 / R230
      R300 / R310 / Photo R320/R800 / PX-G900/R1800/R2400/890/PM-890C/PM-A700
      PM-G720/PM-970C/895/ 785EPX
      Photo 900 /925 / 935/ 950 / 960 / PM-950C/1200 / PM-3000C/1270 / PM-3300C/1280 / PM-3500C
      Photo 1290/2000P/2100/2200 / PM-4000EPX/Pro 5000 / PM-5000C


      Read More..

      Printer Epson Stylus Photo R230 R230X

      Links:

      Troubleshooting:
      • Waste ink full error:
      - Download SCC Service Utiliy: http://www.ssclg.com/epsone.shtml
      - Printer must be connected with the computer
      - Install SSC Service Utility and run the program
      - Choose Epson Stylus Photo R230 in setting configuration and close window.
      - At the bottom right taskbar clik right icon SSC Utility.
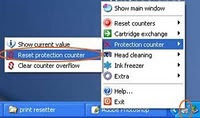
      - Choose Protection Counter / Reset Protection Counter / Clik Yes for the question “Have you Replace waste ink pad”.
      - Restart the printer.

      Read More..

      How to fix message error Remove and check cartridge on HP Printers


      The message on the screen is Remove and check cartridge or Remove and check right cartridge or Remove and check left cartridge.
      It means, in some case, that the cartridge is defective.

      But first, try these solutions,


      Solution 1 : 
      • For some printers, check the back door: it must be closed.

      Solution 2: Check the cartridges

      Solution 3: reset the printer
      1. Power off the machine.
      2. Unplug the power cord from the printer and from the wall outlet.
      3. Wait for 1 minute.
      4. Connect the power cord to the printer and the wall outlet.
      5. Power on the printer.


      Solution 4:
      • Printer on, unplug the power cord.
      • Hold on the "config" button and plug in the power cord..

        Read More..

        Senin, 22 Juli 2013

        Ink counter reset on Canon Pixma MP110


        Error 5800 or 5b00.

        Reset procedure:
        • Enter SERVICE MODE By pressing Menu-Scan-Copy-Scan
        • Enter NVRAM by presing <--- or ---> then OK
        • Enter CMY ink level by pressing <--- or ---> then OK
        • Select 1 by presing <--- or ---> then OK
        • Enter K ink level by presing ---> then OK
        • select 1 by presing <--- or ---> then OK
        • Press reset ( design: // )
        Read More..

        Error 10 on Xerox Phaser 780


        It is a problem with the laser unit. The engine control board did not receive a signal from the laser start-of-scan sensor within the specified time.

        Solutions:
        • Test the top cover and right front cover switches for proper operation. 
        • Power for the laser unit is routed through both switches.
        • Replace Laser unit - fuser.
        • Replace the engine control board

        See more about Xerox Phaser 780
          Read More..

          ServiceTool V1074

          ServiceTool V1074

          Service Tool V1074

          Download here

          Supported Canon Ip2770 and more
          Read More..

          Printhead for HP Officejet and Photosmart printers


          HP Print Head Printhead CB326-30002 CN642A for HP 564XL and HP 564:
          • Hewlett-Packard OfficeJet 6000
          • Hewlett-Packard PhotoSmart B8500
          • Hewlett-Packard PhotoSmart B8550
          • Hewlett-Packard PhotoSmart B8553
          • Hewlett-Packard PhotoSmart B8558
          • Hewlett-Packard PhotoSmart C5300
          • Hewlett-Packard PhotoSmart C5324
          • Hewlett-Packard PhotoSmart C5370
          • Hewlett-Packard PhotoSmart C5373
          • Hewlett-Packard PhotoSmart C5380
          • Hewlett-Packard PhotoSmart C5383
          • Hewlett-Packard PhotoSmart C5388
          • Hewlett-Packard PhotoSmart C5390
          • Hewlett-Packard PhotoSmart C5393
          • Hewlett-Packard PhotoSmart C6300
          • Hewlett-Packard PhotoSmart C6324
          • Hewlett-Packard PhotoSmart C6340
          • Hewlett-Packard PhotoSmart C6350
          • Hewlett-Packard PhotoSmart C6375
          • Hewlett-Packard PhotoSmart C6380
          • Hewlett-Packard PhotoSmart C6383
          • Hewlett-Packard PhotoSmart C6388
          • Hewlett-Packard PhotoSmart D5400
          • Hewlett-Packard PhotoSmart D5445
          • Hewlett-Packard PhotoSmart D5460
          • Hewlett-Packard PhotoSmart D5463
          • Hewlett-Packard PhotoSmart D5468
          • Hewlett-Packard PhotoSmart D7500
          • Hewlett-Packard PhotoSmart D7560
          • Hewlett-Packard PhotoSmart Premium Fax
          • Hewlett-Packard PhotoSmart Premium Fax C309 
          • Hewlett-Packard PhotoSmart Premium Fax C309a
          • Hewlett-Packard PhotoSmart Premium Fax C309g
          • Hewlett-Packard PhotoSmart Premium Fax C310a
          • Hewlett-Packard PhotoSmart Premium Fax C510a
          • PhotoSmart eStation All-in-One
          • PhotoSmart Fax e-All-in-One - C410a

          Genuine HP CN643A - CD868-30001 printhead for HP 920 - 920XL:
          • Hewlett-Packard OfficeJet 6000 Series
          • Hewlett-Packard OfficeJet 6500 
          • Hewlett-Packard OfficeJet 6500A
          • Hewlett-Packard OfficeJet 6500 Wireless
          • Hewlett-Packard OfficeJet 7000
          • Hewlett-Packard OfficeJet 7500
          • Hewlett-Packard OfficeJet 7500A
          • Hewlett-Packard PhotoSmart B109A B109N B109C B109D B109f
          • Hewlett-Packard PhotoSmart B209 Series
          • Hewlett-Packard PhotoSmart Plus


          Read More..

          Waste ink tank reset for Canon S9000


          How to fix it:

          • Turn off the power.
          • Hold down "Resume" button and press "Power" button.
          • Keep holding down "Power" button and let the "Resume" button go.
          • Press "Resume" button 2 times then let both buttons go.
          • Green light will flash then stop blinking.
          • When Green light is solid, press "Resume" button 4 times.
          • Press the Power button and the printer should turn off. If not, press the Power button 1 more time.
          Read More..

          Printer Epson Stylus Photo R390

          Download:

          Troubleshooting:
          • How to reset the waste ink counter:  
          Download Resetter Printer Epson R390
          Turn on the printer
          Set the pc date setting to 1 January 2007
          Adjprog.exe run from the extract of a folder (or locate the file or application. Exe and run it)
          Click accept
          Click on the particular mode adjustment
          Go to interview Then select waste ink pad counter then click ok
          Click “button box” until it is done then click “initialization” button and then click “finish button”
          Turn off the printer for 5secs then turn again
          Set the date today.

          Read More..

          Solving Error code oxc19a0036 on HP Printers

          This error could happen on these printers: C6380, D7560, D5460, C5100...


          Solution 1:
          • Open the right side of the printer 
          • On the mother board simply reseat the 2 white cables.

          Solution 2:
          • Disconnected the USB cable if it is plugged into a computer.
          • Remove the cartridges from the printer as well. 
          • With the power still on, unplug the power cord from the back of the printer, as well as the wall, then wait about 60 seconds. 
          • Plug it back in to the wall first, then the printer, allowing it to boot up. 
          • If it gives you a message similar to "The following ink cartridges appear to be missing or damaged" you may reinstall them at that time when prompted. 
          • If you get the same error message, if you have a number pad on the printer, do the same steps but before plugging it back in, hold the "#" button with the number "3", and plug in the power cord back into the printer while holding the buttons down. 
          • Once the printer starts showing that its coming back up, you can let go of the buttons, and allow it to come back up.
          • If you still continue to get the message, then do the same thing except hold the "#" button and the number "6" on your keypad and allow it to come back up.
          • If you still get the message after all of the above steps are done, contact HP for a replacement if your printer is still in warranty. 


          Solution 3:

          Solution 4:

          Solution 5: resetting the printer
          • Press the Power button to turn on the product. 
          • With the product turned on , disconnect the power cord from the rear of the product.
          • Unplug the power cord from the wall outlet.
          • Wait at least 15 seconds.
          • Plug the power cord back into the wall outlet.
          • Reconnect the power cord to the rear of the product.
          • If the product does not turn on by itself, press the Power button to turn it on.

          Solution 6:


          These 6 solutions could solve to:
          0xC19A0001, 0xC19A0002, 0xC19A0003, 0xC19A0006, 0xC19A0008, 0xC19A0009, 0xC19A0013, 0xC19A0014, 0xC19A0015, 0xC19A0020, 0xC19A0021, 0xC19A0022, 0xC19A0023, 0xC19A0024, 0xC19A0025, 0xC19A0026, 0xC19A0027, 0xC19A0028, 0xC19A0030, 0xC19A0033, 0xC19A0034, 0xC19A0035, 0xC19A0036, 0xC19A0037, 0xc19A0040, 0xc19A0041, 0xc19A0042, 0xC19AC001, 0xC19AC002, 0xC19AC004, 0xC19AC008, 0xC19AC010, 0xC19AC020, 0xC19AC040, 0xC19AC063, 0xC19AC080, 0xC19AC0a5, 0xC19AC0c6, 0xC19AC0e7, 0xC19AC100, 0xC19AC129, 0xC19AC14a, 0xC19AC16b, 0xC19AC18c, 0xC19AC1ad, 0xC19AC1ce, 0xC19AC1ef, 0xC19AC200, 0xC19AC231, 0xC19AC252, 0xC19AC273, 0xC19AC294, 0xC19AC2b5, 0xC19AC2d6, 0xC19AC2f7, 0xC19AC318, 0xC19AC339, 0xC19AC35a, 0xC19AC37b, 0xC19AC39c, 0xC19AC3bd, 0xC19AC3de, 0xC19AC3ff, 0xC19AC400, 0x6100004c, 0xc19a003f
          Read More..

          Machine error 48 or init unable 48 on Brother printers

          The print head cable or circuit board is defective.

          Solution:
          The encoder strip needs to be cleaned with a lint free cloth. If the encoder strip gets dirty, many different problems can occur.

          • If the machine still errors, the encoder strip needs to be replaced – Part Number LS4467001
          • If the machine still errors, replace the carriage PCB assembly – Part Number LS6543001
          • If the machine still errors, replace the Printhead – Part Number LK3211001
          • If the machine still errors, replace the Main PCB assembly – Part Number LT0284011
          Read More..

          Laser printer Xerox Phaser 780

          Downloads:

          Cartridges:

          Parts:
          • 2030203: Fuser Unit

          Troubleshooting:


          Read More..

          iPTool 1 1 5

          iPTool 1.1.5

          support iP 1200, 1300, 1600, 1700, 1800, 2200, 2500, 2600(TEST ONLY)

          Download iPTool 1.1.5
          Read More..

          Ho to reset MX850 waste ink tank


          Solution to reset waste ink tank (error 5B00):
          • Power off printer
          • Hold Resume button then press and hold POWER, the beeper will sound once. 
          • Hold POWER and release RESUME
          • Press RESUME twice, then release all buttons
          • When the indicator lights steady, press RESUME three or four times. The indicator should be orange.
          • Press Power to set data

          Link:
          Read More..

          How to solve error 5011 on Canon Printers


          This error occurs on these models: MP480, MP490, MX340, MX320, MX350,

          Solution 1:
          • Unplug power supply and plug back in.

          Solution 2:
          • Check for no pieces of paper, no littles objetcs in the printers.

          Solution 3:
          • Carefully clean the encoder strip. 
          • Its located behind the carriage that runs all the way from right to left

          Read More..

          Canon Pixma MP495 printer

          Downloads:

          Parts and Cartridges:

            Troubleshooting:
            • Waste ink counter Reset
            Disconnect the power cable
            Hold on "Black", "Color", "Stop/Reset" and "Power" buttons.
            Without release them, plug the power cable in.

            • Ink cartridge reset (ship reset):
            Solution 1 : When "empty cartridge" is displayed, Hold on the "cancel" button until "processing"appears.
            Solution 2: Hold on the "Stop" button until "processing" appears

            • Error E16 or E,1,6:
            Hold on the "Stop" button for 5 seconds.

            Read More..

            Epson C44ux Parts in your printer have expired their service life


            All Epson printers are set to so many thousand prints, once this has reached the end this message appears.

            It is necessary to reset the counters with "SCC Utility":

            http://inkjetprinterhelp.us/epsonSSC.html

            Cartridges:
            T036140: Ink Black 10ml
            T037040: Ink Color 
            Read More..

            Solving error 59 30 on HP Color Laserjet printers

            Printers: HP CLJ 3000 series, 3600series, 3800 series, 4600 series, 4700 series, 5550 series, CP4005 series, M5035...

            Message:
            • 59.30 error: an error occured with the fuser motor during startup or rotation.

            Solution 1:
            • Power off the printer for 5 minutes.
            • Power on.

            Solution 2:
            • Check that connectors J5008 on the fuser motor and J213 on the driver PCA are seated correctly.

            Solution 3:
            • Replace the fuser

            Solution 4:
            • Replace the fuser drive motor

            Solution 5:
            • Take the left side cover off.
            • Look for a a small piece of paper or tiny object.
            Read More..

            Reset purge counter for Brother MFC J265W


            To reset the purge counter of Brother MFC-J265W:
            • Unplug the power cable.
            • Hold down the "Start" button.
            • Without release the "Start" button, connect the power cable.
            • When "Maintenance" appears on the screen, release the "Start" button.
            • Enter 80 with the numerical keypad.
            • With down button go to the purge counter: "Purge00xxx"
            • Enter 2783 with the numerical keypad.
            • Press on "Stop/Exit" to go back in Maintenance mode
            • Enter 9 and 9 to quit the Maintenance mode.

            This solution is available for these Brothers printers too:
            • MFC-210C, MFC-215C, MFC-235C, MFC-260C, MFC-240C, MFC-250C, MFC-255CW, MFC-295CN, MFC-297C
            • MFC-3240C, MFC-3340CN, MFC-3342C, MFC-3360C
            • MFC-410CN, MFC-420CN, MFC-425CN, MFC-440CN, MFC-465CN, MFC-490CW
            • MFC-5440CN, MFC-5840CN, MFC-5460CN, MFC-5860CN, MFC-5490CN, MFC-5890CN, MFC-5895CW,
            • MFC-620CN, MFC-640CN, MFC-640CW, MFC-660CN, MFC-665CW, MFC-680CN, MFC-6490CW, MFC-6890CDW
            • MFC-790CW
            • MFC-820CW, MFC-845CW, MFC-885CW, 
            • MFC-990CW, 
            • MFC-J220, MFC-J265W
            • MFC-J410, MFC-J415W, MFC-J430W
            • MFC-J5910DW
            • MFC-J615W, MFC-J625DW, MFC-J6510DW, MFC-J6710D, MFC-J6710DW, MFC-J6910DW, 
            • MFC-J825DW
            Read More..

            Picture Mate 500

            The Epson PictureMate 500 printer is a personal photo printer that produces affordable high quality photos in the convenience of your home.


            Download and use adjustment program to reset.
            Read More..

            Epson Stylus Pro 7000 error code 00000101

            Problem:
            A printer part has exceeded its useful life, and to prevent damage to other parts as well as abnormal operations/printouts, an error occurs.
            This error occurs when the CR Motor has reached 2.5 million passes, and this indicates the ink tubes should be replaced due to excessive wear and tear.

            Solution:
            To make sure the ink tubes are not worn out, verify no part of any of the tubes shows wear, is loose, or leaks ink anywhere, especially the tube area between the printheads and the ink pipes.
            Read More..

            Unable to print 50 and unable to print 30 error messages on Brothers printers


            Solutions for "Machine error 50" and "Machine error 30":


            Solution 1:
            • Lift the scanner cover using the plastic tabs, located on the left and right side of the machine until it locks securely into the open position.
            • Slide the print head to the middle.
            • Check for any pieces of paper or staple , paper clip...


            Solution 2:

            • Lift the scanner cover using the plastic tabs, located on the left and right side of the machine until it locks securely into the open position.
            • Slide the print head over to the right side under the cover to make sure you clean the entire encoder strip. 
            • With the lint free cloth, firmly grab the encoder strip on both sides and rub the cloth down the strip from one end to the other (left to right then right to left) at least three times.  


            Solution 3:
            the encoder strip which gives the printhead the position is out of place. You have to open the printer and reinsert the strip:


            • For MFC-845CW:
            1) Lift cover. Remove the two plastic panels covering wires. Mark down position of cables then remove them, and remove the now-freed top scanner section entirely.
            2) Remove screws from top plastic shell. Theres two in the back and four in the front. Theres also two plastic tabs in the front that must be bent aside before you can remove the top shell.
            3) Gently put the encoder strip back in its plastic guide.

            • For MFC-440CN:
            1) Remove Plastic wire covers from inside printers, and release plastic stay on lower edge, tilt cover to 90 Degrees
            2) make a note of where each connector goes
            3) release the Ribbon and 3 Multicore cables, removing grounding screw, then remove scanner module by sliding it off the hinges at 90 degrees.
            4) Remove Three Front Panel Screws, carefully leaver front panel upwards releasing front side clips.
            5) Remove front panel by disconnecting ribbon and wireing on both sides.
            6) Remove 6 Screws (2 on back, three at front and one middle right
            7) Carefully remove speaker cable (Red Connector) and lift up plastic casing, leaving printer uncovered.
            8) Re-Seat Encoder Strip.
            9) Re-assemble in reverse and Hey Presto.


            • For MFC-5680CN, MFC-5460CN:
            1. Unhock the top part and the blue plastic strip that stops the top part from falling, seperate it from the machine. Undo the top part of the plastic bit first rather than the bottom one.
            2. Take apart the plastic shields x2. 1st one is on the wiring and 2nd one is on the plastic data ribbon that runs along from the hinges of the top part into the machine.
            3. Undo the wiring and open all the screws. Take apart the front section (LCD).
            4. Take off the cage which is left behing on the top of the machine.
            5. Youll find a plastic (transpartent white) strip running along horizontally. Fix it in a proper line.
            6. Reverse the above steps to setup the machine.
            Read More..

            An officiel reset utility for some Epson printers


            SSC Utility is a free software to reset wast ink pad of Epson printers. But it doesnt work for the last printers.

            For some of them (the list below), Epson give an official reset utility:
            • Artisan 50, 700, 710, 725, 800, 810, 835
            • PictureMate Charm PM225
            • PictureMate Dash
            • PictureMate Show PM300
            • PictureMate Zoom
            • Stylus C120
            • Stylus CX4400, CX4450
            • Stylus CX7400, CX7450
            • Stylus CX8400
            • Stylus CX9400Fax
            • Stylus NX100, NX105, NX200, NX215, NX300, NX400, NX415, NX420, NX510, NX515, NX625
            • Stylus Photo R1900, R280, R2880, RX595, RX680
            • WorkForce 30, 40, 60, 310, 315, 320, 323, 325, 500, 520, 600, 610, 615, 630, 633, 635, 840, 1100 

            Official Reset Utility website:
            Read More..