Ads 468x60px

Pages

Tampilkan postingan dengan label how. Tampilkan semua postingan

Minggu, 23 Oktober 2016

Canon iP 1880 Reset How To

Dear all Resetters,

This is How to Reset Canon Pixma iP 1880 :
1. Press Resume button ( hold for 1 - 2 minutes )
2. Open the cover
3. Release the catridge and then put them on again
4. Close The Cover...
5. Turn Off, then Turn On

Thx to Mr Iman ( STMIK Logika ), Piya Service, Yulianto and Mas Deddy

Happy Reset

Printer Lovers
Read More..

Senin, 19 September 2016

Password n Vacation !!!

Dear All Resetters,

I wonder why still so many people ask me for password.
So I write this once again... just join our mailing list to get the password.
Its all there, just send blank email to indoreset-subscribe@yahoogroups.com
If you do not receive the password just go to files section in
our yahoogroups... its all there...
And I announce that I will take vacation for 3 weeks
I will go to Jakarta, Surabaya and also Bandung City
So... if you there and wanna meet me just email me your
mobile phones .... Im not a new guy in Indonesian IT industry
:) ..... hope to see you all soon.
**********************************************************************
Kadang saya heran kenapa masih banyak yg bertanya password ke saya
Jadi saya tulis sekali lagi, join ke mail list kita ntuk mendapatkan semua passwordnya
Cukup kirim email kosong ke indoreset-subscribe@yahoogroups.com
Jika anda tidak mendapatkan email ttg password saat bergabung
silahkan download di FILES pada web yahoogroups kami.
Juga saya umukan bahwa saya akan bepergian selama 3 minggu
ke Jakarta, Surabaya dan Bandung.
Jadi kalau kalian penasaran ingin bertemu dengan saya
cukup email saja nama dan nomor handphone....
Saya bukan orang baru kok di dunia IT Indonesia :D
Semoga bisa berjumpa dengan rekan-rekan sekalian

Salam Reset ( Happy Reset )

Printer Lovers
Read More..

Sabtu, 30 April 2016

Im Back !!!

Dear All,

Just came back from long..long...long vacation
I hope you all miss me ... he he he
but its a worthed vacation.. i met some of indoreset fans out there
and we became best friend ....
Thank you my friends you all make this vacation a very very nice vacation.
And sorry to other resetter at Surabaya, Bandung and Jakarta that I cannot meet and greet.
Coz its a business trip also.
But dont worry ... Ill be back again to those city !!!

Happy Reset

Printer Lovers
Read More..

Sabtu, 23 April 2016

How to get the password Cara gampang dapat Password

Dear All Resetters,

Now to get all the password is easier.
Just enter your email address in the box at the left corner
and press JOIN YAHOOGROUPS
just wait around 15 minutes, yahoogroups will automatically send
all the link and password.
-----------------------------------------------------------------
Sekarang untuk mendapatkan password akan lebih mudah
cukup masukkan alamat email anda di kotak sebelah kiri
kemudian tekan tombol JOIN YAHOOGROUPS
lalu tunggu 15 menit, yahoogroups akan mengirimkan secara otomatis
semua link download dan passwordnya

Have a Fun Reset

Printer Lovers ( aka indoreset )
Read More..

Selasa, 15 Maret 2016

Epson RX650 Adjustment by m4b1th

Dear All Resetters

here is download link for Epson RX 650 Adjustment Resetter

[JOIN OUR MAILING LIST TO GET DOWNLOAD INFO]


this file is provided by m4b1th from indonesia, thank you m4b1th !
for this file, no password needed .... just download and extract.

I planned to remove all password from our zip files in divshare folder.
but I still very busy right now .... be patient guys ...

Happy Reset

Printer Lovers
Read More..

Selasa, 14 Januari 2014

How to turn on Ipad Suddenly Shutdown Turn Off itself

I have this bizarre experience a week after getting my Ipad from the Apple store. What happened was when playing the Ipad suddenly shutdown or turn off by itself out of the blue. I tried to turn it on again using the power button but it wont do. Then i charged it for 8 hours as i thought the battery is weak, but still the Ipad wont turn on either.

Till then i thought there must be something wrong with the Ipad and i am starting to get worried if i have to send it to the Apple Store for fixing. I began to search the internet to search for the caused of the problem and probable solution. Fortunately i have found some info from one blog which i forgot the link. 

How to turn it on again is pretty simple: Just press and hold the power button + home button simultaneously for 10 second. The Ipad should be turn on again.


Read More..

Senin, 14 Oktober 2013

How to setup OpenDNS

 The job of a DNS server is to translate web address (like www.yahoo.com) into a computer-readable number also known as an IP address (209.131.36.158). Once your computer knows the IP location of a web domain name, it opens the website in your browser.

DNS servers are provided by ISP (like PLDT DSL, GLOBE DSL, and alike) but if the DNS server of our ISP is slow it would take time for the server to translate the web address that adds up to the overall loading time of the website. And this is the time you will experience slow browsing.

To solve this problem, i will teach you on how to setup OpenDNS, a simple and reliable service that speeds up your Internet connection and also handles some other very important issues. There are no software to install, it’s very easy to set up at no cost.

Follow this steps on how to setup OpenDNS and make your web browsing safer, faster,and more reliable

For Microsoft Windows XP, 2000

   1. Open control Panel
   2. click Network Connection
   3. Right click on Local Connection Properties then select Properties
   4. on “General Tab” select Internet Protocol (TCP/IP) then click Properties


   5. Click "Use the Following DNS server addresses"
   6. Change your DNS Server addresses to 208.67.222.222 and 208.67.220.220 and click OK.

For Microsoft Windows Vista and Windows 7
   1. Open Control Panel
   2. Network and Sharing Center
   3. Click on Change adapter Setting

   4. Right Click on Local Area Connection then select Properties

    5. Scroll and double click Internet Protocol Version 4 (TCP/IPVv4)
6. Select Use the following DNS server addresses: and input to
Preferred DNS Server: 208.67.222.222
Alternate DNS server: 208.67.220.220
 For EASY SETUP you can use the COMMAND prompt:

   1. Run
   2. cmd – this will open your command prompt
   3. And type the following

    netsh interface ip set dns “Local Area Connection” static 208.67.222.222
If you want to block adult content like porn use: 208.67.222.123 and 208.67.220.123
Read More..

Minggu, 13 Oktober 2013

How to reset Brother MFC printer

 This Reset Procedure is for Brother MFC Series Printer

Problem: Brother MFC Printer display "unable to clean" or Error 46
Solution: 

  • First turn of the printer
  • Switch on the machine while holding down the menu button until all the leds are flashing on/off. Now you are in “maintenance” mode.
  • Press 80
  • Press the “mono start” button several times until you see “purge: xxxx”
  • Press “2783” in order to reset the purge counter. You will see: “purge:0000”
  • Press the "stop" button.
  • Press “99” to exit the maintenance mode.
and you are done!
Read More..

Kamis, 10 Oktober 2013

How to use Combofix

 
Combofix is a freeware portable application created by sUBs, it was designed to scan a computer for known malware & spyware and, if found, attempt to automatically clean the infection. It s a effective cleaning tool, which is useful compared to other malware and spyware removers. I use this application very frequently in removing nasty Antivirus 2008 and its variants. In addition it also shows you a log files that you can use to search and remove infections which are not automatically removed.

Malware, short for malicious software, is software designed to infiltrate a computer system without the owners informed consent. The expression is a general term used by computer professionals to mean a variety of forms of hostile, intrusive, or annoying software or program code. -Wikipedia
Spyware is a type of malware that can be installed on computers  and collects little bits of information at a time about users without their knowledge. The presence of spyware is typically hidden from the user, and can be difficult to detect.

How to use combofix:
  • Disable or Close all anti-spyware, anti-malware, antivirus, real-time protection, which may affect ComboFix.
  • Close all running programs of your computer
  • Double click ComboFix.exe on you desktop
  • When Combofix finished, it will create logs for you. 

You can download Combofix Here.
A detailed usage instructions can be found on the official site.

Warning: ComboFix is extremely powerful , You should not run ComboFix.exe unless you know what you are doing. Use ComboFix at your own risk. 
Read More..

How to Fix Windows System32 config system file missing or corrupt


When you start your Windows XP-Based computer, you may receive the following error message:

Windows could not start because the following file is missing or corrupt:
Windowssystem32configsystem
You can attempt to repair this file by starting windows setup using the original setup CD-ROM.
Select r at the first screen to start repair.

This problem may occur if "system" file is missing or corrupted:

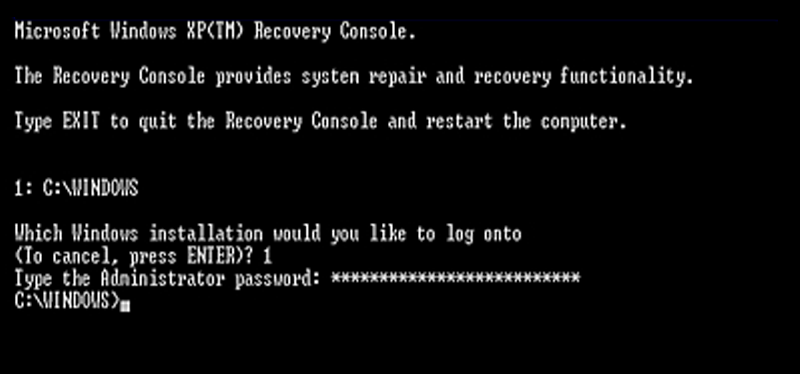
To resolve this issue, you need an original or untouched copy of windows XP, and  configure the computer to boot from the CD-ROM or DVD-ROM drive and follow this steps.

1. Insert the Windows XP bootable CD into the computer.
2. When prompted to press any key to boot from the CD, press any key.

3. Once in the Windows XP setup menu press the "R" key to repair Windows.

4. Log into your Windows installation by pressing the "1" key and pressing enter.
5. You will then be prompted for your administrator password, enter your password is you have any, otherwise just press Enter.
6. At the command prompt type:
copy  %windir%Repairsystem  %windir%System32Config
 7. If prompt to overwrite the files just type "y" and hit enter. Once the file have been successfully copied, remove the CD from the computer and reboot.

Note: Once successfully booted to windows, you will notice that some of your drivers are not installed. Dont worry its normal when doing this repair procedure, Just reinstall your device driver and your done!

If you found this helpful, please leave a comment.
Read More..

Sabtu, 05 Oktober 2013

How to activate windows 7 GodMode

GodMode is a folder that brings together a long list of customization settings allowing you to change all your settings from one place. Its very easy to enable and useful if you tweak things around a lot.

Step 1: Right click on your desktop.
Step 2: Create New folder.
Step 3: Name your new folder with this without the quote, "GodMode.{ED7BA470-8E54-465E-825C-99712043E01C}" and press enter.
Step 4: Open the folder.

Read More..

Sabtu, 28 September 2013

How to Remove Bios Password for Acer Laptops


If you key in the wrong Supervisor password three times, an error code is generated and system is disabled like in the image below.

To unlock the BIOS, perform the following steps:
   1. On a different machine, run the BIOS_PW.EXE file along with the error code generated. For example:
        bios_pw 14452 0
   2. Four ASCII strings are generated as output. Select and note down any one of the strings.

   3. Reboot the machine with the locked BIOS and then use either any of the strings as the BIOS user
       password.

Read More..

Kamis, 26 September 2013

How to fix Windows XP Activation Loop


Do you encounter a windows XP activation loop? Where it continually ask you to activate windows, but the activation wizard will tells you that it is already activated.

What you need: Untouched Windows XP Disc Installer or Original/Backup copy of windowsXP Disc

I always encounter this problem everytime I repair-install a Windows XP system. So here is what I did to fix the problem. First restart your PC then

1.) Log onto Windows using SAFEMODE with command prompt.
2.) Wait until the windows boot then Type "explorer" in the command prompt.
3.) Explore Windows XP CD and copy the TOOLS folder (located at support folder) to C:
4.) In the TOOLS folder extract the DEPLOY.cab (this will create a new folder called deploy).
5.) Open the DEPLOY folder and run SYSPREP.
6.) Click FACTORY button. Notice that your PC will shut down.
7.) Power on your PC and wait till the windows desktop screen appear.
8.) Once finish Click RESEAL button and wait. Notice that your PC will shut down again.
9.) Power on again your PC and your done.

You may also be able to use the fix from Microsoft here
Read More..

Rabu, 25 September 2013

How to Change Desktop Wallpaper in Windows 7 Starter


Windows 7 Starter is the edition of Windows 7 that contains the fewest features. You cant have Aero theme in this version. You cant change desktop wallpaper, Screen Saver, Themes and Visual Style. In fact, you dont see "Personalize" menu in desktop context menu.

With this "Personalization Panel" created by HB860 for Windows 7 Starter and Home Basic Editions brings Personalize Panel of Windows 7 Ultimate Edition to low-end restricted editions.

It allows you to:

    * Change Desktop wallpaper
    * Theme support
    * Aero glass support
    * Desktop context menu integration
    * Change window and taskbar color
    * Portable version also available

Read More..

Minggu, 22 September 2013

How to disable store demo mode in Samsung LCDTV


What is Store Demo Mode or Shop Mode?

Essentially, Shop Mode or Store Demo Mode returns the TV automatically to its default settings in thirty minutes. It is usually used by retailers who want to demonstrate functions to customers, and then want the TV to return to its default settings without the bother of manually resetting the TV.

Easy FIX in removing your Samsung LCDTV from Shop Mode or Store Demo Mode. First, confirm your TV is in Shop Mode or Store Demo Mode:

1. Press the INFO button on your remote control. A list of settings appears.
2. See if the Picture Mode setting is set to Shop Mode or Store Demo Mode.

There are three methods for removing your TV from Shop Mode or Store Demo Mode. If the first method does not work, try the second or third method.

Method 1
  1. Press the Volume button on the side panel of your TV. If your TV does not have a side panel, press the Volume button on the front panel. The TV displays the volume bar.
  2. Press the Menu button on the side panel of your TV for about seven seconds. Again, if your TV does not have a side panel, press the Menu button on the front panel. If Dynamic or Dynamic Mode is displayed on the screen, your TV has been removed from Shop Mode or Store Demo Mode.
Method 2
  1. Press the Volume button on your remote. The TV displays the volume bar.
  2. Press the Menu button on the side panel of your TV for about seven seconds. Again, if your TV does not have a side panel, press the Menu button on the front panel. If Dynamic or Dynamic Mode is displayed on the screen, your TV has been removed from Shop Mode or Store Demo Mode.
Method 3
  1. Press and hold the Volume button on your TV. The TV displays the volume bar.
  2. As you are holding the Volume button, press the Menu button on the side panel of your TV for about seven seconds. Again, if your TV does not have a side panel, press the Menu button on the front panel. If Dynamic or Dynamic Mode is displayed on the screen, your TV has been removed from Shop Mode or Store Demo Mode.
Note: You may want to press the INFO button on your remote again to confirm you TV is no longer in Shop Mode or Store Demo Mode.

Source: Neowin
Read More..

How to Create QR Code with Goo gl


QR codes have become quite a norm with newspapers, websites and magazines where people are asked to click a picture and read the QR code to perform certain actions. Now you will be able to do the same without having to worry about using software to create the codes.

Google publicly launched their URL Shortener with extra feature where you can convert a URL to QR code which can then be read by a mobile device.

To create a QR code with Goo.gl, just shorten the URL and add ".qr" to the end of it.
For example http://goo.gl/UQDfJ  is the shortened URL for http://tipsterhub.blogspot.com, adding .qr to the URL ( http://goo.gl/UQDfJ.qr) will display the QR code which you can then download and add to your webpage or application.

Source: Techie-Buzz.com
Read More..

Sabtu, 21 September 2013

How to Automatically Log On to windows

To automatically log-on to windows without needing to enter a username and password,

Type in RUN
control userpasswords2


it will open the user accounts application. On the Users tab, clear the box for “Users must enter a username and password to use this computer”, and click on OK.


An Automatically Log On dialog box will appear; then enter the password for the account you want to use and its done...
Read More..

Kamis, 19 September 2013

How to use Asus USB MIR adaptor to other motherboard


One of my client recently try to use the ASUS USB/MIR REV. 1.11 (the 2 usb port type) adaptor which he got from his old ASUS motherboard to his new computer. His problem is any USB storage device he try to insert in ASUS USB/MIR port a "USB Device Not Recognized" pop-up appear.
The problem is, Asus have fitted filtering on the two data lines to each USB port in the form of a series resistor (10 ohms on one line and 4.7 ohms on the other) and a shunt capacitor to ground at the USB socket end which cause the problem.

The only solution is to remove this filtering by removing the four SMD capacitor (C2, C3, C4, C5). Do not remove C1, C6 and the electrolytics CE1 and CE2. I use hot air rework station to remove those SMD capacitors. After the removal the Asus USB/MIR device recognized any USB flash drive that I inserted.
Read More..

Selasa, 17 September 2013

How to reset Brother DCP 195C printer


Does your Brother DCP model printer display an error like this?
clean unable 46
unable to print clean pad is full

Here is the proper reset code sequence to reset DCP printers without numeric keypad:

This instruction is also applicable to printer model: Brother DCP 110C, 115C, 120C, 130C, 135C, 145C, 150C, 165C, 185C

1. Press the Menu, then Mono Start key then press the UP arrow key 4 times to make the machine enter the maintenance mode and "ERROR 46" pops-up in the display.

2. Enter maintenance mode 80: Select 8 by pressing the UP/DOWN arrow key and push OK key and select 0 and push OK key

3. Now Press MONO arrow key several times until you see PURGE:XXXXX

4. Select 2 and push OK, Select 7 and push OK, 8 and push OK, select 3 and push OK and the purge counter is now reset to 00000.

5. Press STOP/EXIT key to go to root of maintenance mode

6. Enter code 99 to exit maintenance mode: Select 9 and push OK, Select 9 and push OK.
Read More..

Senin, 16 September 2013

How to Reset Canon ip1980 and IP1880


When you try to print and a pop-up message appear saying that "The ink absorber is full" it means that the ink absorber or wastepad inside your printer is almost full. In order to solve this you need a technical knowledge on how to disassemble the printer and software resetter.


FIRST STEPS:  Entering Service Mode

First you have to enter in service mode state in order to used the resetter. To do that follow this procedure,
1. Unplug the power cable of the printer.
2. Press and hold down the power button with your index finger and then plug-in the power cable.
3. While holding down the power button, press the reset/resume button twice and release the power button
4. You will notice that the Alternate Blinking error is gone, this means that the printer is in Service Mode state.
5. Download Canon IP1980 Resetter Here
    Download Canon IP1880 Resetter Here


SECOND STEPS: Using the Software

1. After you download the resetter, extract it and double click "GeneralTool"
2. Select or Check the EEPROM CLEAR then click the MAIN button, you will notice that the power button light will blink. It means that the it clear the waste ink counter.


3. Unplug the power cable to turn off the printer
4. Then plug-in again the power cable. then turn ON the printer. And its DONE!

Warning: Getting rid of the error message won’t change that you might end up with ink leaking out of the printer if you don’t either replace or clean them. 
Read More..