Ads 468x60px

Pages

Tampilkan postingan dengan label mode. Tampilkan semua postingan

Rabu, 21 Desember 2016

Cara Membobol Password Windows XP dengan Safe Mode

Mungkin anda pernah nemui kasus, windows terpassword, padahal anda harus masuk ke windows untuk cek virus, misalnya. Sedangkan anda atau pemiliknya lupa passwordnya. Tidak usah khawatir, untuk Membobol Password Windows, Berikut ulasan dari Kang Eko ....

Cara Membobol Password Windows XP dengan Safe Mode :

1. Hidupkan Komputer dan tekan - tekan tombol F8 untuk memunculkan boot option windows.

2. Jika sudah muncul boot optionnya, pilih " SAFE MODE "
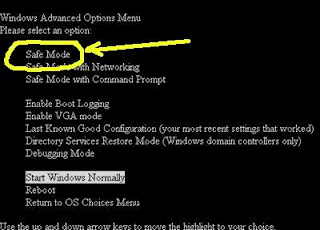

3. Tunggu sebentar sampai tampilan loginnya keluar.
Nah disini kunci dari trik ini, dalam Windows XP biasanya ada tiga jenis account yaitu Administrator yang memegang penuh sistem operasi, User biasa yang bersifat Administrator dan Guest ( tamu ). Dalam hal ini password milik user selain administrator lah yang akan dibobol .

Kebanyakan penggunaa windows XP tidak tahu dengan user administrator, padahal user administrator memegang penuh akses terhadap windows XP, biasanya pengguna windows XP jarang sekali memakai user administrator ini, apalagi memberi password.
Dan ingat Trik ini hanya bisa dilakukan jika user administrator tidak di beri password. 

Jika ternyata di password ada cara lain yg akan Kang Eko bahas di posting berikutnya. Jika tidak dipassword, Login sebagai administrator.

4. Jika telah berhasil login, maka Hak akses penuh sudah ada ditangan. Untuk merubah password user klik di Start lalu Control Panel kemudian pilih User Account. Pilih user account yang akan dibobol passwordnya, sebagai contoh pada gambar di bawah ini user “Deka Handayani”


5. Setelah di klik pada bagian selanjutnya pilih "remove password" untuk mengosongkan password user, Kemudian pilih "confirm remove password"


6. dan Pasword user Windows XP telah berhasil dibobol. Disini anda juga bisa memberikan password baru pada user target.

Untuk menghindari trik ini dapat dilakukan pada komputer anda. Saya sarankan untuk memberi password pada user administrator anda.

Semoga bermanfaat.
Read More..

Rabu, 16 November 2016

Cara Kerja Printer Laser

Postingan Kang Eko kali ini adalah tentang Cara Kerja Printer Laser. Ini memang pengetahuan lama, tapi mudah2 an masih bermanfaat bagi kita semua... Mari kita simak bersama...

Cara Kerja Printer Laser

Cara Kerja printer laser adalah dengan prinsip elektrik statis. Awalnya Photoreceptor Drum (OPC Drum) diberi muatan positif oleh Primary Charging Roller (PCR), dengan memberikan arus listrik padanya. (Bagian ini ada di dalam Toner Catrid).


Kemudian printer menyorotkan sinar laser yang sangat kecil melewati permukaan photoreceptor drum untuk membentuk image tulisan atau gambar sesuai dengan data yang dikirim oleh komputer, berupa satu garis horizontal pada satu waktu.

Sinar laser menyorotkan cahaya pada Photoreceptor Drum untuk membentuk titik dan mematikan cahaya untuk tempat kosong per halaman. Sinar laser tidak bergerak dengan sendirinya namun sinar laser itu dipantulkan melalui cermin yang bisa bergerak sendiri. Sinar laser ini pasti berhenti pada titik di photoreceptor drum dan membentuk image electrostatic. Bagian permukaan drum yg terkena sinar laser yang berubah menjadi bermuatan negatif.


Setelah pola image lengkap, serbuk toner yang tersimpan di Toner hopper (di dalam cartridge) diambil oleh Unit Developer (Magnetic Sleeve) . Toner yang bermuatan positif melekat pada area Photoreceptor Drum yang telah membentuk image electrostastik, yaitu bagian Photoreceptor Drum yg terkena sinar laser (muatan negativ) (hukum alam positf akan mendekat pada negatif)

Lembar kertas (dengan muatan negatif yang lebih kuat dari Photoreceptor Drum) bergerak sepanjang sabuk dan roll diatas drum yang telah dibubuhi serbuk toner yang berpola. Kertas mendorong bubuk toner dari drum untuk berpindah melekat pada kertas sehingga pola image berserbuk toner berpindah pada kertas dan siap untuk difinishing pada Fuser.


Toner yang tidak menempel pada kertas dan masih melekat pada OPC Drum akan dihapus oleh Wiper Blade dan kemudian masuk ke dalam Waste Bin (Pembuangan)

Fuser (Pemanas)
Fuser mengeringkan serbuk toner yang telah berbentuk image pada kertas agar kuat melekat pada kertas. Kemudian kertas yang telah tercetak dikeluarkan menuju tray pengeluaran kertas pada printer.


Sedangkan bagian yg memancarkan sinar laser yg kita bahas di bagian atas adalah :
Laser Scanner Assembly

Laser Scanner biasanya terdiri dari 3 unit bagian :
1. Laser
2. Cermin berputar
3. Lensa

Unit laser menerima data gambar maupun text dari komputer, lalu data tersebut dipancarkan ke drum berupa titik-titik yang membentuk text atau gambar, bertahap secara horizontal pada drum.

Demikian Cara Kerja Printer Laser, semoga menjadi tambahan wawasan untuk kita semua...
Read More..

Minggu, 22 September 2013

How to disable store demo mode in Samsung LCDTV


What is Store Demo Mode or Shop Mode?

Essentially, Shop Mode or Store Demo Mode returns the TV automatically to its default settings in thirty minutes. It is usually used by retailers who want to demonstrate functions to customers, and then want the TV to return to its default settings without the bother of manually resetting the TV.

Easy FIX in removing your Samsung LCDTV from Shop Mode or Store Demo Mode. First, confirm your TV is in Shop Mode or Store Demo Mode:

1. Press the INFO button on your remote control. A list of settings appears.
2. See if the Picture Mode setting is set to Shop Mode or Store Demo Mode.

There are three methods for removing your TV from Shop Mode or Store Demo Mode. If the first method does not work, try the second or third method.

Method 1
  1. Press the Volume button on the side panel of your TV. If your TV does not have a side panel, press the Volume button on the front panel. The TV displays the volume bar.
  2. Press the Menu button on the side panel of your TV for about seven seconds. Again, if your TV does not have a side panel, press the Menu button on the front panel. If Dynamic or Dynamic Mode is displayed on the screen, your TV has been removed from Shop Mode or Store Demo Mode.
Method 2
  1. Press the Volume button on your remote. The TV displays the volume bar.
  2. Press the Menu button on the side panel of your TV for about seven seconds. Again, if your TV does not have a side panel, press the Menu button on the front panel. If Dynamic or Dynamic Mode is displayed on the screen, your TV has been removed from Shop Mode or Store Demo Mode.
Method 3
  1. Press and hold the Volume button on your TV. The TV displays the volume bar.
  2. As you are holding the Volume button, press the Menu button on the side panel of your TV for about seven seconds. Again, if your TV does not have a side panel, press the Menu button on the front panel. If Dynamic or Dynamic Mode is displayed on the screen, your TV has been removed from Shop Mode or Store Demo Mode.
Note: You may want to press the INFO button on your remote again to confirm you TV is no longer in Shop Mode or Store Demo Mode.

Source: Neowin
Read More..

Sabtu, 14 September 2013

Factory Service Mode for LCD monitor


The following procedures work with many LCD monitor according to their brand, but not necessarily for all of them.

Some the benefit using the Factory Service Mode
  • Check the accumulation time or how long this lcd monitor are use.
  • Check lcd monitor manufactured date
  • Check the LCD panel model number
Warning: Before you need to change any value on the factory service mode, please write down the original value first. We are not responsibility for any damage and unwanted effect after using these method on your lcd monitor.
Login Factory Service Mode for Benq LCD Monitor
For Older Benq LCD Model, First turn off the monitor then Press and hold the "MENU" & "EXIT" button, then press "POWER" button to on the lcd monitor. After the monitor turn ON you need to press "i" button to login to factory service mode
For New Benq LCD Model, First turn off the monitor then Press the "POWER", "SELECT" and "MENU" button at the same time. If the monitor is ON, press the "V" button to login to factory service mode.

Login Factory Service Mode for PHILIPS LCD Monitor
1. Press and hold the "AUTO" & "MENU" button,
2. Then press "POWER" button to turn ON the lcd monitor.
3. Now press the "MENU" button to open the OSD menu, at the bottom of menu, you get the extra selection, Go and select it, then you can login to factory service mode.

Login Factory Service Mode for Dell LCD Monitor

1. Press and hold the "AUTO" & "+" button some model use "ENTER" and "+" button, then power on the lcd monitor. Then, press the "MENU" button to open the osd menu.
2. In the bottom of OSD menu, you will notice an extra selection called "FACTORY".
3. Select "FACTORY" and press the "ENTER" button and youre login to the dell factory service mode.

Login Factory Service Mode for Samsung LCD Monitor
1. Power on the lcd monitor and open the OSD menu.
2. Set the Brightness and Contrast to 0.
3. Then press and hold the "SOURCE or ENTER" button for 5 second until the  "SERVICE FUNCTION MENU" pop-up.

Login Factory Service Mode for LG LCD Monitor
1. First turn off the lcd monitor, then press and hold the "MENU" button, then turn on the monitor. Release MENU button after the monitor is turn on.
2. Press "MENU" button to open the OSD menu, at the bottom of menu, you can see a new selection to go into the factory service mode. Inside the factory service mode, you can see useful information like, product model, manufacturer date, F-ENGINE chipset version, lcd panel number and etc.

Login Factory Service Mode for ACER LCD Monitor
1. Press and hold the "AUTO" & "MENU" button,
2. Then press "POWER" button to turn ON the lcd monitor.
3. Now press the "MENU" button to open the OSD menu, at the bottom of menu, you get the extra selection, Go and select it, then you can login to factory service mode.

Read More..

Jumat, 13 September 2013

Boot your Droid X into recovery mode


It’s always good to know how to get it into recovery mode. This little trick probably won’t be used much until the Android hacking/developing crowd gains root access to our new Droid X, but you might as well know about it now. And no, this won’t brick your phone.

Instructions…

1.  Turn your phone off.
2.  Hold down “Home” and press “Power” until the Motorola logo appears.
3.  Release  ”Power” and continue to hold “Home” until an exclamation appears.
4.  Release “Home” and press the “Search” button once.
5.  Your phone will now enter recovery.

To get out of it, simply use your volume up and down buttons until “reboot system now” is highlighted and then press the camera button.

Source:[Droid-Life]
Read More..