Ads 468x60px

Pages

Tampilkan postingan dengan label series. Tampilkan semua postingan

Minggu, 01 Januari 2017

Epson Stylus RX series part 1

Dear All Resetters

This is for RX Series that I have, just download
As usual the date is in the indoreset.bat tha already
included in the ZIP file.
Happy Reset
*******************************************
Buat rekan2x ini RX series yg aku punya
tanggal pemakaian ada di file indoreset.bat
yg udah termasuk dalam file ZIP nya

Download Link :
RX500 510
[JOIN OUR MAILING LIST TO GET DOWNLOAD INFO]


RX 600 620 630
[JOIN OUR MAILING LIST TO GET DOWNLOAD INFO]

RX 700
[JOIN OUR MAILING LIST TO GET DOWNLOAD INFO]

Salam Reset

Printer Lovers
Read More..

Senin, 19 Desember 2016

Epson CX3700 CX3800 CX3805 CX3810 DX 3800 DX3850

Dear All

This is for Epson Stylus CX3700 CX3800
CX3805 CX3810 DX 3800 DX3850

Happy download :
[JOIN OUR MAILING LIST TO GET DOWNLOAD INFO]


Salam Reset

nDry ( indoreset@yahoo.co.id )
Read More..

Jumat, 09 Desember 2016

Epson Stylus C59 Adjustment

Dear All

Thanks to Manuel from Philipines for this resetter
*********************************************
Terimakasih buat Manuel dr Philipina untuk resetter ini

Download :
[JOIN OUR MAILING LIST TO GET DOWNLOAD INFO]


Happy Reset

nDry ( indoreset@yahoo.co.id )
Read More..

Kamis, 01 Desember 2016

Epson TX series Resetter complete list


 TX100 TX101 TX105 TX109, TX102 TX103,  TX100 EAL, TX110 TX111, TX115, TX200 TX209, TX200-TX210, TX220, TX210 TX510FN, TX300F, , SX200 SX205, TX400, TX410 415 EAL,  TX400 Latin, TX400 SX400, TX420, TX510, TX550, TX550W, TX650ECC, TX700W Latin, TX700W, TX800, TX810,  TX820


more resetter? join free INDORESET FORUM !!!


enjoy!

felz
Read More..

Selasa, 18 Oktober 2016

Epson CX4100 CX4200 CX4700 CX4800 DX4200 DX4250 DX4800 DX4850

Last for today

Epson CX4100 CX4200 CX4700 CX4800 DX4200 DX4250 DX4800 DX4850
Resetter adjustment
Download :
[JOIN OUR MAILING LIST TO GET DOWNLOAD INFO]


Happy Reset !!! ( Salam Reset .. capek deh ... )

Printer Lovers
Read More..

Kamis, 01 September 2016

Old Canon Resetter Series by Request

Dear All Resetter,
this is for Old Canon Series, no pass for this

Canon Reset Etc in english ( manual reset instruction )
[JOIN OUR MAILING LIST TO GET DOWNLOAD INFO]


Cara2 Pemakaian Canon in Indonesian
[JOIN OUR MAILING LIST TO GET DOWNLOAD INFO]


i320-i255win98
[JOIN OUR MAILING LIST TO GET DOWNLOAD INFO]


i320-i255
[JOIN OUR MAILING LIST TO GET DOWNLOAD INFO]


ip1000
[JOIN OUR MAILING LIST TO GET DOWNLOAD INFO]


Happy Reset ( Salam Reset )

Printer Lovers
Read More..

Jumat, 17 Juni 2016

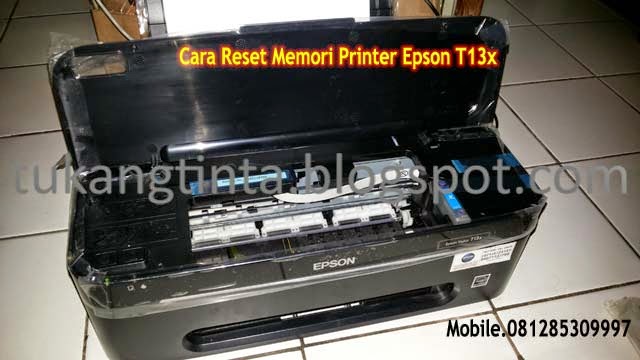
Cara Reset Memori Printer Epson T13x

http://tukangtinta.blogspot.com/
Hello Sobat, Kali ini Bang Mone dari TukangTinta.Comingin membagikan pengalaman tentang Cara Reset Memori Printer Epson T13 atau T13x, indikasi awal printer tidak bisa digunakan saat mau melakukan test print dan pesan di monitor komputer ada tulisan warning " General Error ", lalu di lampu printer blingking berkedip warna merah, langsung saja sobat lihat langkah langkahnya dibawah ini :

Langkah awal, printer dengan keadaan hidup dan kabel usb terpasang dengan benar, lalu sobat download dahulu program resetter Epson t13 klik disini dan Saat mau menjalankan program resetter non aktifkan dahulu anti virus dikomputer sobat.

http://tukangtinta.blogspot.com/


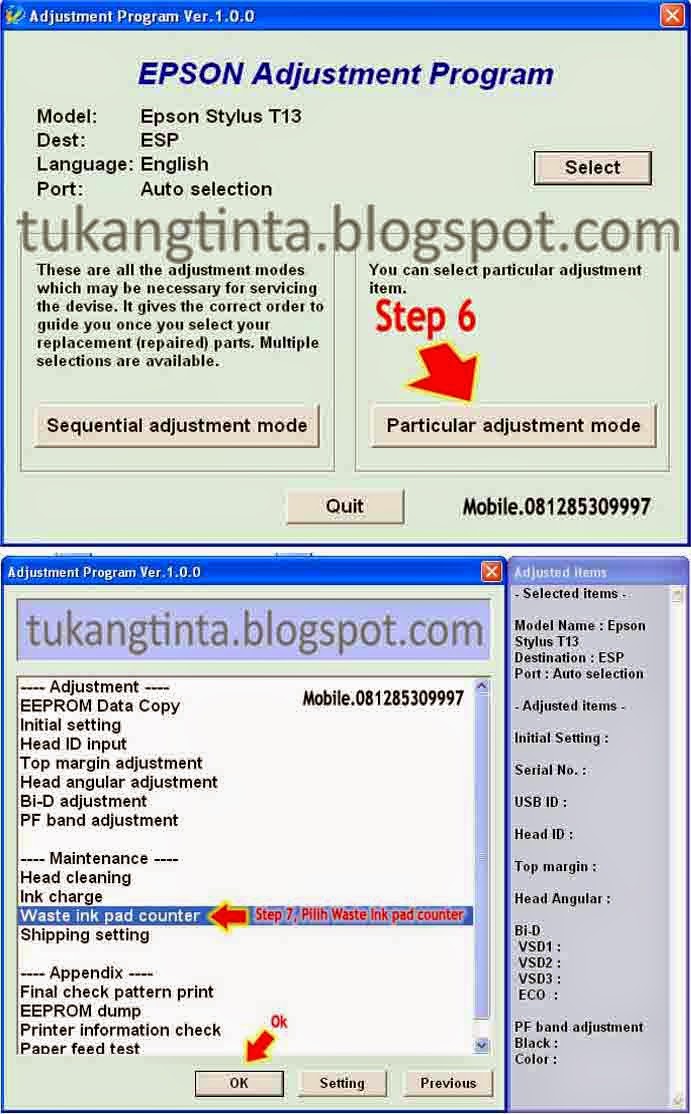
Buka dan jalankan program resetter Epson T13nya, klik 2x " AdjProg " setelah itu, 
Step 1  klik Accept


Step 2 klik Select, 
Step 3 untuk memilih Type Printer sobat, 
Step 4 Destination pilih ESP, 
Step 5 Port pilih Auto Selection lalu klik Ok,
http://tukangtinta.blogspot.com/


Step 6 klik menu Particular Adjustment Mode, 
Step 7 pilih menu Waste Ink Pad Counter lalu klik Ok,


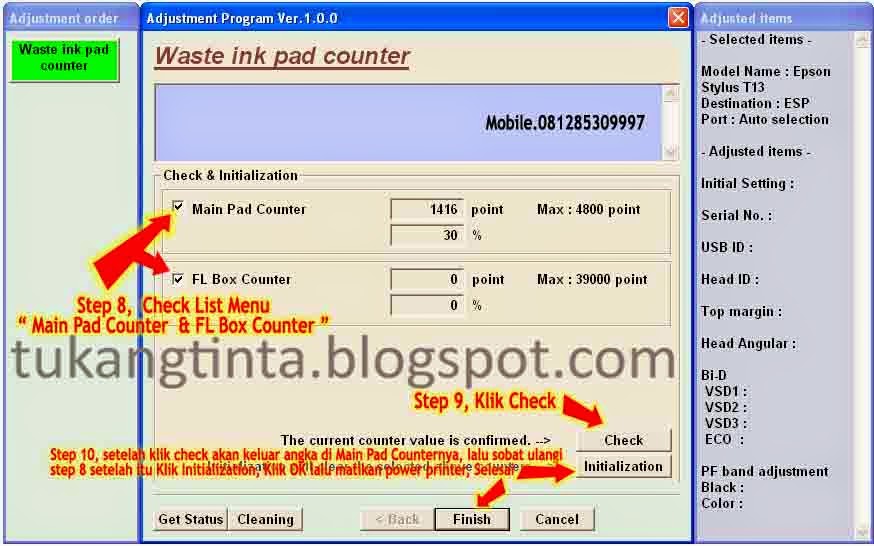
http://tukangtinta.blogspot.com/Step 8 klik Check List Menu Main Pad Counter dan FL Box Counter,  
Step 9 klik Check nanti akan timbul angka di menu Main Pad Counter yang artinya angka yang tampil itulah yang harus kita Reset menjadi 0. setelah sudah lalu sobat ulangin Step 8 kemudian langsung ke Step 10 klik Initialization, klik OK lalu sobat disuruh matikan power printernya tapi jangan cabut kabel powernya.

Selesai.


Sekian artikel Bang Mone dari TukangTinta.Com mengenai Cara Reset Memori Printer Epson T13 dan jika sobat ingin melihat artikel lain Bang Mone Cara Head Cleaning Printer Epsonklik disini atau Cara Menganalisa dan Memperbaiki Masalah Printer Epson (General Error) klik disini , Semoga dapat bermanfaat, berguna dan menginspirasi sobat semua.

> Download Driver Printer Epson T13 klik disini
> Download Program Resetter Epson T13 klik disini

Salam,
Bang Mone dari TukangTinta.Com

www.tukangtinta.com
Read More..

Sabtu, 09 April 2016

Cara Melancarkan Print Head Printer Epson R230

Hello Sobat, Kali ini Bang Mone dari TukangTinta.Com ingin membagikan pengalaman tentang " Cara Melancarkan Print Head Printer Epson R230 ", perlu diketahui sebelumnya sobat untuk masalah hasil print yang kurang baik pada printer epson, masalah paling umum itu bisa terjadi pada ketidaklancaran pada print headnya, bisa juga dari cartridgenya ataupun dari instalasi infusnya, nah!! kali ini Bang Mone dari TukangTinta.Com ingin berbagi bagaimana cara yang benar untuk melancarkan print head epson,

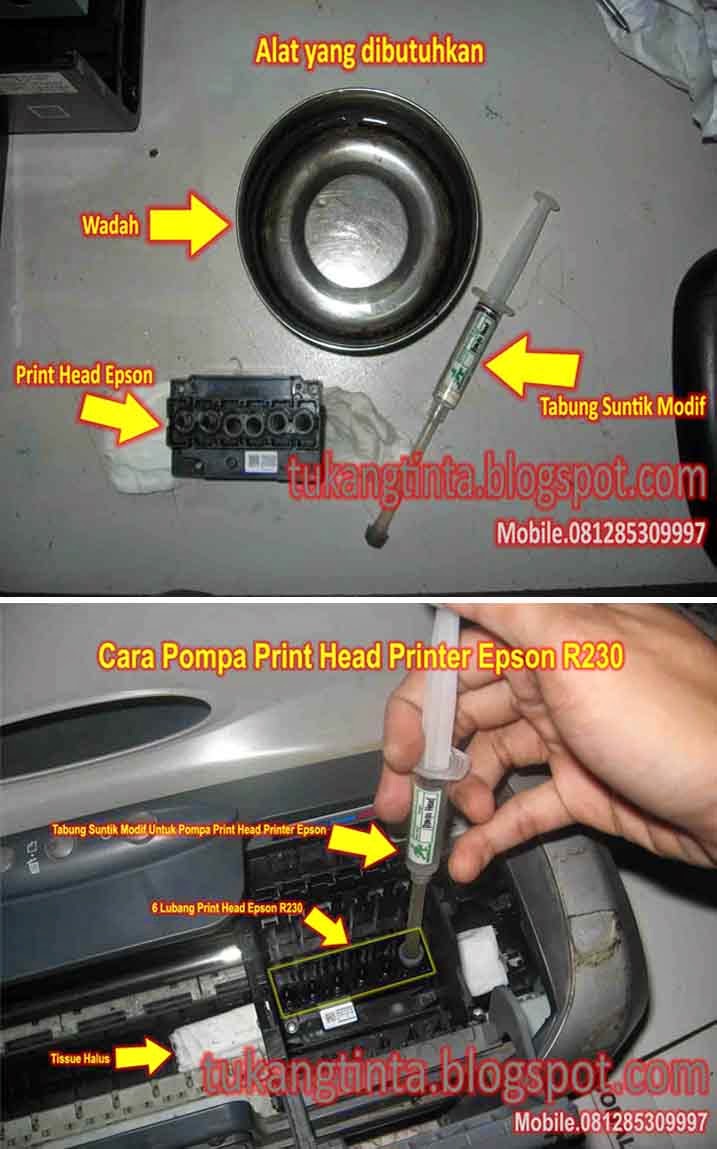
Pertama sobat siapkan dahulu perlengkapan yang dibutuhkan, seperti ;

http://tukangtinta.blogspot.com/
  1. Tabung suntik yang sudah dimodif. (gambar saya sertakan disamping)
  2. Wadah atau tempat air hangat.
  3. Cairan pelancar print head khusus epson atau gunakan air hangat.
  4. Tissue halus.
Setelah semua perlengkapan sudah ada, taruh tissue halus dibawah print headnya lalu pompa lubang print head yang hasilnya kurang baik, saat sobat pompa lubang print headnya pastikan tidak berat terasa atau lancar.


Selesai.


Sekian artikel Bang Mone dari TukangTinta.Com mengenai " Cara Melancarkan Print Head Printer Epson R230 ", Semoga dapat bermanfaat, berguna dan menginspirasi sobat semua.

> Download Driver Printer Epson R230 klik disini

Salam,  
Bang Mone dari TukangTinta.Com
www.tukangtinta.com
Mobile.+6281285309997
PIN BB 7E0EB6C2
Read More..

Kamis, 03 Maret 2016

RESET PRINTER CATRIDGE HP

Saya Sertakan naskah asli cara reset hp type 9xx dan reset catridge hp.

Permasalahan. : Printer Hp kebanyakan punya penyakit blink setelah di ganti2 catridge. Jadi pada suatu saat printer tidak akan bisa diganti catridge walaupin dengan yang baru. Masalah blink ini sudah banyak terjadi pada hp A3 yang baru HP 1180c dan HP 1220.

Cara reset printer :

  1. Masukan catridge yang di aggap bagus (printer msh blink)
  2. Matikan printer.
  3. Tekan dan tahan tombol power sampai head bergerak lalu lepas.
  4. Apabila catridge bagus blink langsung hilang. Printer sudah dpt digunakan.

Cara reset catrridge hp (dibawah telah dijelaskan detail).

  1. Pertama tutup dengan selotip titik2 pada catridge yang berwarna Biru. (berapa titik yang ditutup tergantung type catridge).
  2. Buka tutup printer lalu masukan catridge pada printer. Tutup kembali
  3. Biasanya printer langsung tidak blink.
  4. Buka kembali catridge dan cabut selotip yang menempel
  5. Tutup titik2 yang berwarna Hijau dengan selotip
  6. Buka tutup printer lalu masukan catridge pada printer. Tutup kembali
  7. Buka kembali catridge dan cabut selotip yang menempel
  8. Catridge sudah bisa digunakan.

(ini naskah aslinya)

Kamis, 10 Oktober 2013

Canon GENERIC S SERIES RESET CODE

Waste Ink Counter Reset.
(1) Turn off the printer.
(2) Press and hold the RESUME button, then press and hold the POWER button.
(3) Release the RESUME button, Next press and release the RESUME button two(2) more times in
succession. Note: you are still holding the POWER button). The printers carriage will "reset"
or move momentarily. If the above was properly performed the printer will enter the
"Service Mode".
(4) Press the RESUME button 4 times, this will select the clear waste ink counter function. The lamp
will alternate (change) color with each key press.
1. Service/Factory test printout, including ink sensor check.
2. EEPROM - Info printout. javascript:void(0)
3. EEPROM - Initialization.
4. Reset the Waste ink counter.
5. Printer model setting. (More selections beyond this point - However it is best leave them unaltered - You have been warned!)
After selecting the desired mode (eg 4), press the POWER button to "set" the change, and return to the top of the function selection menu. Press the POWER button again to restart the printer.
Read More..

Sabtu, 14 September 2013

E061 E100 Error Codes iR6570 Series iR5075 Series

Symptom

* E061-0001 (Potential ON)
* E061-0002 (Potential OFF)
* E100-0001
* E227-0004
Cause
* The pin is broken on the Primary Fan 2 Duct. The Laser Shutter is activated by the pin on the Primary Fan Duct Assembly. The linkage is pinched not allowing the laser shutter to be fully actuated (may also indicate E227-0004). Faulty Laser Scanner Assembly.
* Defective DC Controller PCB Assembly.

Action

1. Check the shutter operation and the pin on the Primary Fan Duct Assembly. If the
pin is broken replace the Primary Fan 2 Duct (iR6570 : FC6-3540-000 / iR5075
FL2-5834-000) or the Primary Fan Duct Assembly (iR6570 : FM2-3074-000 / iR5075
FM2-9694-000). If the Laser Scanner Assembly (iR6570 : FM2-3670-000 / iR5075
FM2-9832-000) has been replaced and error codes E100-0001/ E227-0004 are
intermittently indicated, proceed to the next step.
2. Remove the Primary Fan Duct Assembly (this assembly has a pin on it
that activates the laser shutter).
3. Remove and reinstall the Laser Scanner Assembly.
4. Install the Primary Fan Duct Assembly. This should free the linkage
allowing the laser shutter to be fully actuated.
5. Finally a DC Con clear resolved both of the intermittent issues (E100-0001/
E227-0004)

Blank Image or Dark Fogging Image (Including Blank Areas) and E061-0001 / E061-0002 Errors Occur : iR6570 Series
Approved


Symptom

* Blank copies,Dark fogging
* E061-0001 and E061-0002

Action

When the above error code/image problems are experienced, perform the following:

1. Check the potential sensor wiring harness for any damage. This is caused by the harness being trapped between the hopper assembly and the cable tie head.
2. If the cable is damaged repair or replace as necessary.
3. Reposition the head of the cable ties on the cable guide in a downward position.
4. Input "1" under Service Mode > COPIER > FUNCTION > DPC > DPC, press the OK key and switch the Main power off and on so as to forcibly execute the Potential Control.
Read More..

Selasa, 10 September 2013

Canon GENERIC S SERIES RESET CODE

Waste Ink Counter Reset.
(1) Turn off the printer.
(2) Press and hold the RESUME button, then press and hold the POWER button.
(3) Release the RESUME button, Next press and release the RESUME button two(2) more times in
succession. Note: you are still holding the POWER button). The printers carriage will "reset"
or move momentarily. If the above was properly performed the printer will enter the
"Service Mode".
(4) Press the RESUME button 4 times, this will select the clear waste ink counter function. The lamp
will alternate (change) color with each key press.
1. Service/Factory test printout, including ink sensor check.
2. EEPROM - Info printout. javascript:void(0)
3. EEPROM - Initialization.
4. Reset the Waste ink counter.
5. Printer model setting. (More selections beyond this point - However it is best leave them unaltered - You have been warned!)
After selecting the desired mode (eg 4), press the POWER button to "set" the change, and return to the top of the function selection menu. Press the POWER button again to restart the printer.

Read More..

Kamis, 08 Agustus 2013

Error Code 325 ECM 326 ECM 327 ECM 328 ECM on HP Officejet pro 8500 series


Error Code 325 ECM, 326 ECM, 327 ECM, 328 ECM are Fax errors.

Telephone line conditions are very poor.


Solution 1:
  • Try to send the fax at a different time when telephone line conditions have improved. 

Solution 2:
  • Disable ECM (Error Correction Mode). 
  • Errors might still occur, and might result in a degraded image quality on the received page. However, the ability to send the entire document will be improved. 
Read More..

Minggu, 04 Agustus 2013

Error 49 FF81 on HP 4100mfp and 9000mfp series

Verify printer functionality:
  1. Power off the MFP and remove the EIO hard disk. To remove the hard disk remove the two screws from the EIO1 or EIO2 slot on the back of the MFP (depending on which slot the hard drive is installed in). Power up the MFP (turn it on), it will boot up with the message HARD DISK NOT INSTALLED, COPY AND SEND DISABLED.
  2. Print a Configuration Page by performing the following:
    1. Press the Menu key until Information is shown on the display, then press the Select key to highlight the Information Menu.
    2. Highlight Print Configuration and press the Select key.
    3. The MFP should print out two pages.

  3. Test the MFP by send several print jobs over the network to the MFP from a PC.
  4. If the MFP prints the test print jobs successfully, power down the MFP and reinstall the hard drive. Proceed to the next section and perform a Disk Init.
  5. If the MFP fails to successfully print any of these tests then contact HP Support for further assistance.

How to perform a Disk Init
  1. Power off the MFP.
  2. Reinstall the EIO hard drive in the EIO slot, and tighten the screws.
  3. Press and continue to hold down the START button on the control panel of the MFP. While holding it down, power up the MFP.
  4. Continue to hold down the START button until the MFP initializes and the three control panel LEDs are all lit up solid. Now release the START button.
  5. Press and release the LEFT navigation button. The message INITIALIZE DISKS will be displayed on the control panel display.
  6. Press and release the SELECT button. Two rows of asterisks will be displayed on the control panel display.
  7. When the asterisks disappear and the message READY appears on the control panel display, the issue should be resolved.
  8. If the 49.FF81 errors reoccur or the MFP hangs while performing the Disk Init procedure, then contact HP Support.
Read More..